Nuclear Reactor

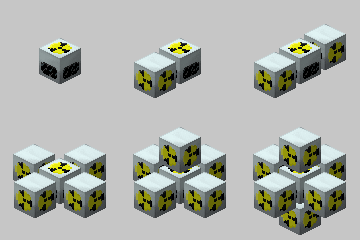
A Nuclear Reactor is one of the most powerful ways to generate EU. However, they are very dangerous and require careful observation to control. One bad setup can destroy the reactor and everything around it. If this is all a bit over your head, you can try the Safe, Easy, & Powerful Nuclear Reactor. It will guide you through building a safe, powerful and automated Nuclear Reactor. For design ideas, try the Nuclear Reactor - Advanced Layouts page.
The Nuclear Reactor and its 6 added chambers act as a single big block. When a chunk boundary is running through the reactor, the chambers and their contents can disconnect and drop as items. This can disrupt the regulatory system of the reactor, resulting in a meltdown.
The total EMC cost of a nuclear reactor is 143640.5 (including 6 reactor chambers.)
Contents
- 1 Recipe
- 2 Usage
- 3 Impact of Active Cooling
- 4 Reactor Terms
- 5 Reactor Components
- 6 Environmental Effects of Reactor Heat
- 7 Reactor Monitoring
- 8 Protection
- 9 Reactor Classification
- 10 Tips & Tricks
- 11 EE and the use of Reactors
- 12 Example of a six-chambered Nuclear Reactor setup
- 13 More
- 14 Testing
- 15 Video Tutorials
Recipe
| Raw Materials Needed | (excl. 6 chambers) | |
|---|---|---|
| 4 | Coolant Cell | |
| 58 | Refined Iron | |
| 34 | Tin | |
| 26 | Redstone Dust | |
| 8 | Glowstone Dust | |
| 8 | Lapis Lazuli | |
| 25 | Rubber | |
| 51 | Copper | |
| 30 | Bronze | |
| 8 | Cobblestone |
Usage
Reactors can be very complex and are recommended for experienced players only, but if you control them, they are arguably the best source of EU, generating up to thousands of EU per tick - millions over the life of its uranium cells. Uranium cells generate heat as well, however, and the reactors must be cooled, or the reactor will have a meltdown, causing a massive explosion, similar to a Nuke. You can cool a reactor with Ice, Water buckets, Coolant Cells, or Water flowing outside the reactor.
It is best to use reactors in places where there is no sun light like the Nether or underground since a HV solar array will generally generate more power. Some designs can however create far more power than HV solar, but this comes at the expense of safety.
Impact of Active Cooling
The maximum rate of passive cooling of a Nuclear Reactor is about 70 heat per second. This limits the sustained average power output of any passively cooled reactor by a great amount, as big nuclear reactors can generate about 2,000 heat per second.
To actively cool a reactor you must provide with ice. Providing with water buckets is impractical because of the limited cooling capacity of a full stack (1 single item) of water buckets. Also handling empty buckets takes additional machinery.
The Nuclear Reactor needs 1 ice per second for every 300 EU / tick. So when your reactor output reads 1970 EU it will take about 7 ice per second to keep the reactor from heating up. A cooling system (an array of Singularity Compressors) takes 20 to 30 EU / tick. (or one Condensor with filter and pneumatic tube would work and not use any power) This can be powered with smaller generators like solar panels.
Using active cooling you can to run a Nuclear Reactor with a power output 2 orders of magnitude larger than running a reactor with passive cooling. The maintenance of the cooling system is completely offset by the extra efficiency of the uranium used. And it is futile compared to the power output of the reactor.
Reactor Terms
Here are some of the terms often used when describing a reactor and its design.
- Reactor Tick: A reactor 'ticks' once every second. This is when heat, EU generation, and cooling is calculated.
- Reactor Design: The pattern in which components are placed within a reactor. A good design can give you nice, safe energy, and a bad design can spontaneously crater-ize your home and its contents.
- Full Cycle: The time it takes for a full Uranium Cell to be used up. 10,000 reactor ticks, or precisely 2 hours 46 minutes 40 seconds.
- Uranium Pulse: Pulses occur during a reactor tick, producing heat and EU for each uranium cell. Uranium Cells placed next to each other will interact to produce multiple pulses per reactor tick.
- Heat: The reactor itself and its components can all store heat. If heat levels gets too high, then components will melt, and there will be a risk of a reactor meltdown.
- Cooling: Cooling is provided by internal components like a Cooling Cell and the outside environment like water. Cooling is needed to counteract the effects of heat and hopefully keep your reactor (and home) intact.
- Cooldown Period: The time required for an inactive reactor to cool all the excess heat it has collected.
- Reactor Hull: This is where heat goes when it's not stored in a component. The maximum heat storage is 10,000, but it can be increased with Reactor Chambers and Integrated Reactor Plating.
- Reactor Class: All reactor designs can be a class like "Mark-I-O ED" or "Mark-III EB" which gives an indication of how well a design will perform.
- Reactor Efficiency: The average number of pulses per Uranium Cell. (efficiency = pulses / cells) The more Uranium Cells that are placed next to each other, the higher the efficiency, but also the higher the risk.
- Breeder Reactor: A type of reactor design that produces little energy. Its purpose is to recharge Depleted Isotope Cells into full Uranium Cells.
Reactor Components
A list of the various components that can be used within a reactor.
- Reactor Chamber: Not an internal component, these are placed adjacent to the reactor block in order to increase the number of slots within a reactor, increase the strength of the hull (+1000), and add a small amount of cooling (2/tick plus additional water/lava effect).
- Uranium Cell: The key part of a reactor. Each cell will pulse one or more times per tick, producing some heat and 200 EU. On its own, a cell will only pulse once (10 EU/t) per tick, but each adjacent Uranium Cell will add an additional pulse per tick, producing additional heat and packets of 200 EU. A Uranium Cell will last up to 10,000 reactor ticks (2 hours 47 minutes), generating anywhere between 2,000,000 to 10,000,000 EU, depending on the efficiency of the design. Uranium Cells have a fairly small chance to turn into Near-Depleted Uranium Cells when they're used up. (About a 1 in 10 chance).
- Cooling Cell: A single cell can store up to 10,000 heat away from the reactor hull; any more heat will cause the cell to melt. The cell will also cool 1 point of its stored heat each reactor tick.
- Integrated Reactor Plating: Plating will distribute heat from an adjacent uranium cells into surrounding cooling cells and also into other plating to be further distributed. Distributing heat to another plating happens only once; the second plating will not distribute to a third plating. Plating also increases the reactor's hull strength (+100) and can store up to 10,000 heat itself if it is unable to direct it into a cooling cell. This stored heat will dissipate at a rate of 0.1 per reactor tick.
- Integrated Heat Disperser: These components will attempt to balance out the levels of heat within the reactor hull, itself, and any adjacent component capable of storing heat. During each tick a disperser can exchange up to 25 heat with the reactor hull and up to 6 heat with each of the surrounding components. For example, if a reactor hull has 120 heat stored and fresh dispenser is placed inside and surrounded by 4 cooling cells, then the dispenser will begin balancing the heat levels until the hull, itself, and the cooling cells each have 20 heat, negating other cooling/heating effects such as water and/or lava.
- Near-Depleted Uranium Cell: The 'empty' state of a Uranium Cell; these can be made manually, or have a chance of appearing when a Uranium Cell runs dry within a reactor. They produce 1 heat each reactor tick, a very small amount compared to the average Uranium Cell.
- Depleted Isotope Cell: A depleted Uranium Cell mixed with coal dust. When placed next to a Uranium Cell it recharges into a full cell once again. Isotope cells produce 1 heat and will cause adjacent Uranium Cells to pulse an additional time each tick. This extra pulse will produce heat but not EU. Isotope cells charge much faster if the reactor is running very hot, though this adds a chance of explosion/lava-ication of nearby solid blocks.
- Re-Enriched Uranium Cell: The fully charged state of an isotope cell, it will continue to produce only 1 heat and no EU but it will no longer react with adjacent uranium cells. Combined with another coal dust, it will become a brand new Uranium Cell.
- Water Bucket: When a reactor's hull has more than 4000 heat, it will evaporate the water, reducing the heat level by 250 and leaving the empty bucket behind. (The reactor won't spit it out.)
- Ice Block: Each reactor tick, if a reactor's hull has more than 300 heat, it will sublimate 1 ice block, reducing the heat level by 300.
- Lava Bucket: A lava bucket will increase a reactor's hull heat level by 2,000, and the empty bucket will remain in the reactor. This is useful for 'breeder' type reactors while recharging isotope cells.
- Warning Very Explosive
Environmental Effects of Reactor Heat
As reactors heat up, they will start having detrimental effects on their immediate surroundings. Each additional chamber increases the threshold by 1000 heat, to a maximum of +6000 with 6 chambers. Each piece of hull plating further increases the heat threshold by 100.
The exact heat effects for reactors are:
| % of max hull heat | Environmental effect |
|---|---|
| 40% | Flammable blocks within a 5x5x5 cube have a chance of burning. |
| 50% | Water blocks within a 5x5x5 cube (both sources and flowing) will have a chance of evaporating. |
| 70% | Entities within a 7x7x7 cube (instead of a 3x3x3 cube) will get hurt from the radiation exposure. |
| 85% | Blocks within a 5x5x5 cube (including the reactor chambers!) have a chance of burning or turning into lava ('moving' lava only, no source blocks). |
| 100% | What enviroment? That smoking crater? |
Reactor Monitoring
Nuclear Control enables you to control your reactor with several objects such as a thermometer. The Remote Thermal Monitor used along with a Remote Sensor Kit is an extremely efficient way to control the heat of your reactor and to stop it when it's temperature goes beyond a certain point. For manual monitoring you can use a Remote Sensor Kit and an Industrial Information Panel.
Note that while the chunks around a Nuclear Reactor can unload the Nuclear Reactor itself will remain loaded once it has become loaded. Because of this an active reactor in an unloaded chunk will melt down despite any control mechanism applied to it. If you switch off the reactor before its chunk unloads you are safe.
Protection
The relatively simple way to protect against a nuclear melt-down is to use reinforced stone, glass a
nd doors. (In Tekkit 3.1.1 and up, forcefields are more effective, as they are invincible as long as they have power.) To the right, there are two pictures showing the blast resistance of reinforced materials. In the top photo, there is an unprotected explosion (left), an explosion inside a 1 block thick solid reinforced stone (right top) and 2 block thick solid reinforced stone (right bottom). Notice the tiny hole near the top of the wall. The bottom photo shows a crater caused by a nuclear melt-down where the left half of the explosion was protected by a 3x3 wall of reinforced stone.
Another way to protect the surroundings is to make a three block thick wall of reinforced stone and water, filled with water in the middle. For additional protection, this structure can be supported by a Basalt, Basalt Cobblestone or Obsidian shell.
Through testing it has been found that a two block thick wall of Reinforced Stone or Reinforced Glass will almost completely negate damage behind the wall. Encasing your reactor in a box two blocks thick (including edges and corners) will stop nearly all of the blast from escaping. There still may be a small amount of damage outside, though, so don't trust it too much. Also, keep in mind that Obsidian has been severely nerfed by IC2; it's blast resistance is now only 40, whereas Reinforced Stone, glass, and Reinforced Door's are all 150.
Placing the reactor inside a body of water also seems to reduce damage significantly after a reactor explosion.
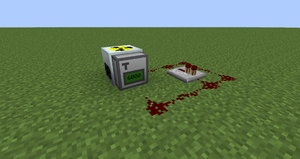
There is another way of protecting yourself against meltdowns thanks to one of the newest updates, which is to use a Thermal Monitor connected to a simple redstone circuit. This method is 100% safe. In the design to the right, once the thermal monitor is triggered, the redstone is "locked" on, and the reactor will stay shut down until you manually restart it. This is unnecessary, as the thermal monitor will turn on and off every single time the reactor drops below or goes above the set temperature, allowing the reactor to "hover" at that temperature. You can even fill a reactor with nothing but uranium and still be safe... though it would take a very long time to cool.
Note: This will NOT work with Breeders. The Depleted Isotope Cell will still generate a very small amount of heat each tick. If there is not some form of cooling system, the reactor will eventually explode.
If you have enough power, a more advanced way to protect yourself (and your home) from unwanted nuclear ventilation is through the use of Modular Force Fields and the MFFS Reactor Containment Field. A forcefield will block all of the blast from escaping. It's suggested that you power the field with the
reactor itself to ensure an ample supply of energy for the field. It will monitor the heat level of your reactor, provide water cooling if wanted, as well as contain the blast should it overheat. Another bit that is extremely useful for preventing explosions is the MFFS Reactor Monitor and Client. The monitor will check the heat level in the reactor, and will send a signal to the Client when the reactor is on, and at variable levels of heat. When a set level of heat has been reached (a maximum level of heat allowed for example) the Client will turn on a redstone signal, which when used with a redstone wire, can turn off your reactor. This is a surefire way to prevent your reactor from overheating if used properly.
A possible failsafe, if everything else fails, a single TNT block can be triggered by a thermal monitor, blowing up the reactor, but saving the environment and the contents of the reactor. This will only cause the amount of damage TNT would, not a shiny new crater.
Reactor Classification
All reactor designs fall into a set of pre-defined categories. This makes it easier to see, at a glance, how effective a design can be when either looking up designs on the IC forums or posting a design yourself.
Mark I
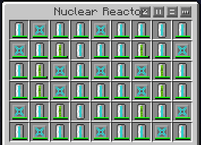
Mark I reactors generate no excess heat each reactor tick and thus are safe to use continuously for as long as you supply Uranium. Mark Is tend have a low efficiency, but that's the price of a completely safe reactor.
Mark Is have two sub-classes: Mark I-I for design that do not rely in outside cooling in anyway and Mark I-O for those that do.
By using external cooling, such as an energy condenser / energy collector duo constantly pumping ice into your reactor, it is possible to have a Mark I with an extremely high efficiency (greater than 4).
Mark II
Mark II designs produce a small amount of excess heat and will need to be given a cool down period eventually to prevent the hull reaching 85% maximum heat or melting component. A Mark II must complete at least one full cycle before encountering heat problems.
The sub-class for Mark IIs denote how many cycles the design can run before reaching critical heat levels. For example Mark II-3 will need a cool down period after running 3 cycles in a row. Mark II s that can run 16 times or more get the special sub-class 'E' (Mark II-E) for almost being a Mark I.
Mark III
Mark III reactors tend to have an emphasis on efficiency at the cost of safety. Mark IIIs are unable to complete a full cycle without going into meltdown and thus need to be shutdown mid-cycle in order to deal with the high amount of excess heat. This can be done manually or by using Redstone.
Mark IIIs have the additional condition that they must run at least 10% of a cycle (16 mins 40 secs) before reaching critical heat or losing any components.
Mark IV
Mark IVs still have to run at least 10% of a cycle, just like Mark IIIs. The difference being that Mark IVs are allowed to lose components to overheating, and that must be replaced before the reactor goes critical.
Mark V
Mark Vs are for those who want to squeeze every last scrap of EU from their uranium cells; they cannot run long without needing a cool down period. You'd better have great Redstone timer skills, or you'll never be able to turn your back on these things.
Additional Suffixes
As well as being Mark I to V, reactor designs also have one or more suffixes to better inform people about their performance.
Single Use Coolants - A reactor that relies on a supply of ice and/or water buckets in order to maintain its classification should be suffixed with '-SUC'.
Efficiency - To calculate efficiency, take the number of uranium pulses a design makes per tick and divide it by the number of uranium cells it possesses. The number provided will show the efficiency rating a design has:
| Number | Rating |
|---|---|
| Exactly 1 | EE |
| Between 1 and 2 | ED |
| Between 2 and 3 | EC |
| Between 3 and 4 | EB |
| 4 or greater | EA |
Breeder
This suffix is for designs that also recharges isotope cells. Isotope cells charge up faster when the reactor runs hot, so heat management is important. There are three breeder types:
-Negative-Breeders slowly lose heat over time and will need heat to be added manually, or they can be left for a safe slow way to recharge isotopes.
-Equal-Breeders have exactly the same heat generation as they do cooling ability and usually only require a user to boost the reactor's heat level manually at the beginning.
-Positive-Breeders gain heat over time and will require more precise cool down management for the reactor to remain hot.
Reactors whose sole purpose is to recharge cells may not even have a 'Mark' classification and are simply called Breeders instead, with the efficiency/SUC suffix added.
| Heat | Ticks Required |
|---|---|
| 0-2,999 | 40,000 |
| 3,000-5,999 | 20,000 |
| 6,000-8,999 | 10,000 |
| 9,000+ | 5,000 |
Tips & Tricks
Here are a few tips and things to look out for when using a reactor.
- Do use a Thermal Monitor to shut out an overheating reactor. The Nuclear Reactor, its contents and its neighborhood out-value the price of a Thermal Monitor by far.
- Build the cooling system first. It is more complicated than the reactor. The reactor can not be operated without.
- Redstone timers can turn even Mark Vs into self regulating-reactors, but if you're not the Redstone equivalent of "The One", then you might want to make use of RedPower Logic's timers and other compact circuit blocks.
- Heat Dispensers can only draw 6 heat out of a component per reactor tick, so look for components that seem to be holding more heat than the others and try to fix the problem.
- While the reactor hull's maximum heat tolerance can be increased, all other components are fixed at 10,000. So even though a reactor can survive 10,000+ heat, Heat Dispensers will still pull that heat into components and melt them all.
- A math trick to calculate the number of pulses (P) for complex (i.e. Mark IV or Mark V) reactors is to multiply the number of uranium cells (U) by 5 and subtract the number of sides of uranium cells not touching other uranium cells (S) so P = 5 * U - S. So a Mark V reactor (9x6 uranium cells) would make 5 * (9 * 6) - 2 * (9 + 6) pulses = 240 pulses (and 2400 EU/t which would explode even HV cables and HV transformers, and 2400 heat per second which would explode the reactor in less then 8 seconds.
- It is possible to use buildcraft with a nuclear reactor by connecting a pipe to a reactor chamber or the reactor. This can be used to pump ice into the reactor from a chest continuously. Ice can be produced with pumps over infinite water sources adjacent to compressors (creating snowballs) feeding into another compressor which turns snowballs to ice, but it requires about 1400 EU per ice block, and may not be practical. However, it may be possible to acquire a decent amount of snowballs by using snow golems and a block breaker. You could also pump ice out of a condenser having emc made with one or two mark III collectors and a relay, but it is recommended to use redpower when doing that since the fact buildcraft and equivelent exchange can cause many problems together.
- If having the reactor into a water chamber, you can use Water Mills, Detector Cables and a sticky piston cutoff mechanism to shut off the reactor when the water starts to evaporate. This will make Mark-III reactors almost completely safe, and also make Mark-IV reactors very safe. It will probaly not work so well on Mark V reactors. If using this water mill method, you can also generate a small extra amount of electricity in the process.
- The more advanced reactors usually have a separate control room.
Note: A sticky piston cutoff mechanism works so; one redstone current goes into a solid block attached to a sticky piston. On the other side there's a redstone repeater. When the piston retracts, an active redstone circuit is cut off. This mechanism can be used over and over again so it isn't a one-time machine.
EE and the use of Reactors
Equivalent Exchange can be a huge help in moderating your reactor. Using MFFD Reactor Heat Control units you can moderate the desired temp of your reactor, by either heating it up (through the use of lava buckets), or cooling it down (through the use of water buckets or ice blocks) automatically. With the use of these units, even Mark V reactors can be ran for much longer periods of time (provided the ice or water buckets are in ample supply).
Using the Equivalent Exchange mod, you can have a Collector/Condenser generate ice blocks and have a Retriever pump them directly into the units, providing an unending supply of ice/water buckets for your hungry reactor.
Not only this, but due to the low EMC cost of uranium ore , (1/2 a diamond), if you build the most basic reactor setup, a uranium cell surrounded by 4 coolant cells , and all the resultant energy is used by a Mass Fabricator, the UU-Matter is used to make 2 gold ore, macerate both, then use the resultant EMC to buy two more Uranium Ores, you can easily keep your reactor running without any outside materials. Using this process, you can easily end up with more Uranium than you started with.
Example of a six-chambered Nuclear Reactor setup
| Raw Materials Needed |
(excl. 6 chambers) | |
|---|---|---|
| 8 | Uranium Cells | |
| 20 | Integrated Heat Dispersers | |
| 26 | Coolant Cells |
More
- For a simple guide to creating a Nuclear Reactor, see Tutorial / Safe, Easy, & Powerful Nuclear Reactor
- For information on how to create advanced reactor layouts, see Nuclear Reactor/Advanced Layouts.
- Most servers disable nuclear explosions but it still might crash the Server or lag it.
Testing
You can test potential reactor layouts with the following Java Applicaton:
IndustrialCraft Reactor Planner v2Oh,


